Part 5: CI/CD pipeline with MuleSoft and GitHub Actions - Enabling MFA through a Connected App
Learn how to set up our pipeline with a connected app, which is useful when you have multi-factor authentication activated in Anypoint Platform.
CI/CD Pipeline with MuleSoft & GitHub Actions· Part 5 of 6
- 1.Part 1: How to set up a CI/CD pipeline to deploy your MuleSoft apps to CloudHub using GitHub Actions
- 2.Part 2: CI/CD pipeline with MuleSoft and GitHub Actions - secured/encrypted properties
- 3.Part 3: CI/CD pipeline with MuleSoft and GitHub Actions - MUnit testing
- 4.Part 4: CI/CD pipeline with MuleSoft and GitHub Actions - MUnit minimum coverage percentage
- 5.Part 5: CI/CD pipeline with MuleSoft and GitHub Actions - Enabling MFA through a Connected App
- 6.Part 6: CI/CD pipeline with MuleSoft and GitHub Actions - Deploying to CloudHub 2.0

So far we’ve been setting up our CI/CD pipelines using our Anypoint Platform username and password. However, if you’re using an enterprise account, most likely you’re using MFA or Multi-Factor Authentication for your account. The process to create your CI/CD pipeline with this authentication method is quite different.
If you haven’t been following the series or you’re not familiar with GitHub Actions, we recommend you start from the first article to understand how we are setting up all the configurations we need.
In this post, we’ll learn how to set up our pipeline with a connected app, which is useful when you have multi-factor authentication activated in Anypoint Platform.
Prerequisites
You should already understand the basic CI/CD setup we’ve been doing in the previous articles. In summary, this is what you should already know:
- How to configure and run the
build.ymlfile for the pipeline under.github/workflows. - How to configure secrets in your GitHub repository.
Note
The code for this article is not located on the main branch of the github-actions repository. Instead, a new branch was created to avoid confusion: connected-app. If you want to check the rest of the files we discuss here, like pom or build, please refer to that branch.
Create a connected app in Anypoint Platform
Because we are signing in to Anypoint Platform using MFA (through an app on your phone or an SMS code, for example), we can no longer rely on just our username and password. We have to create something called Connected App. To do this, sign in to Anypoint Platform and navigate to Access Management > Connected Apps.

Click on Create app. Add any name you want to identify this app, like github-actions. Select App acts on its own behalf and click on Add Scopes.
Select the following scopes for your current business group and the Sandbox environment (since this is the one we’re using for this demo):
- Design Center Developer
- View Environment
- View Organization
- Profile
- Cloudhub Organization Admin
- Create Applications
- Delete Applications
- Download Applications
- Read Applications
- Read Servers
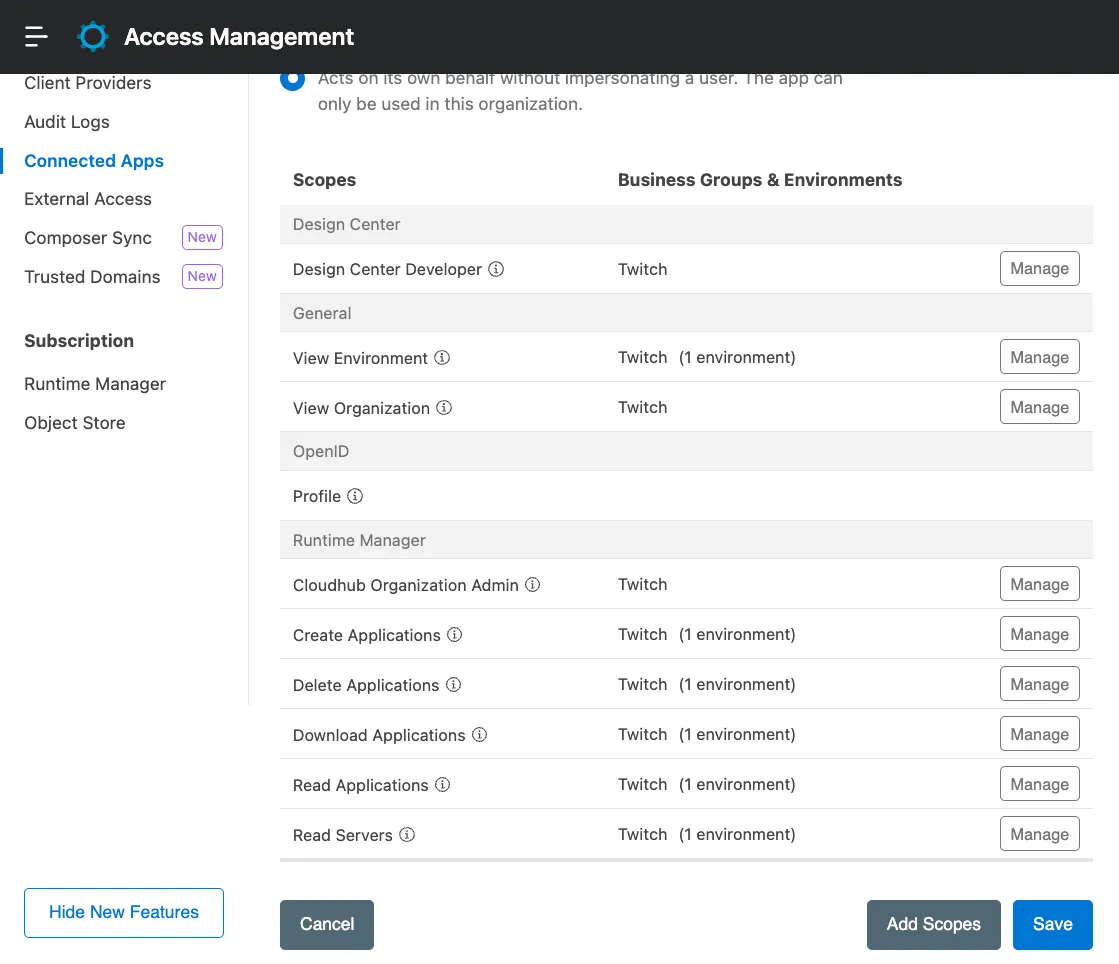
Click on Save.
After you create the app, make sure to copy both ID and Secret. We will use these in the pipeline for our authentication method.
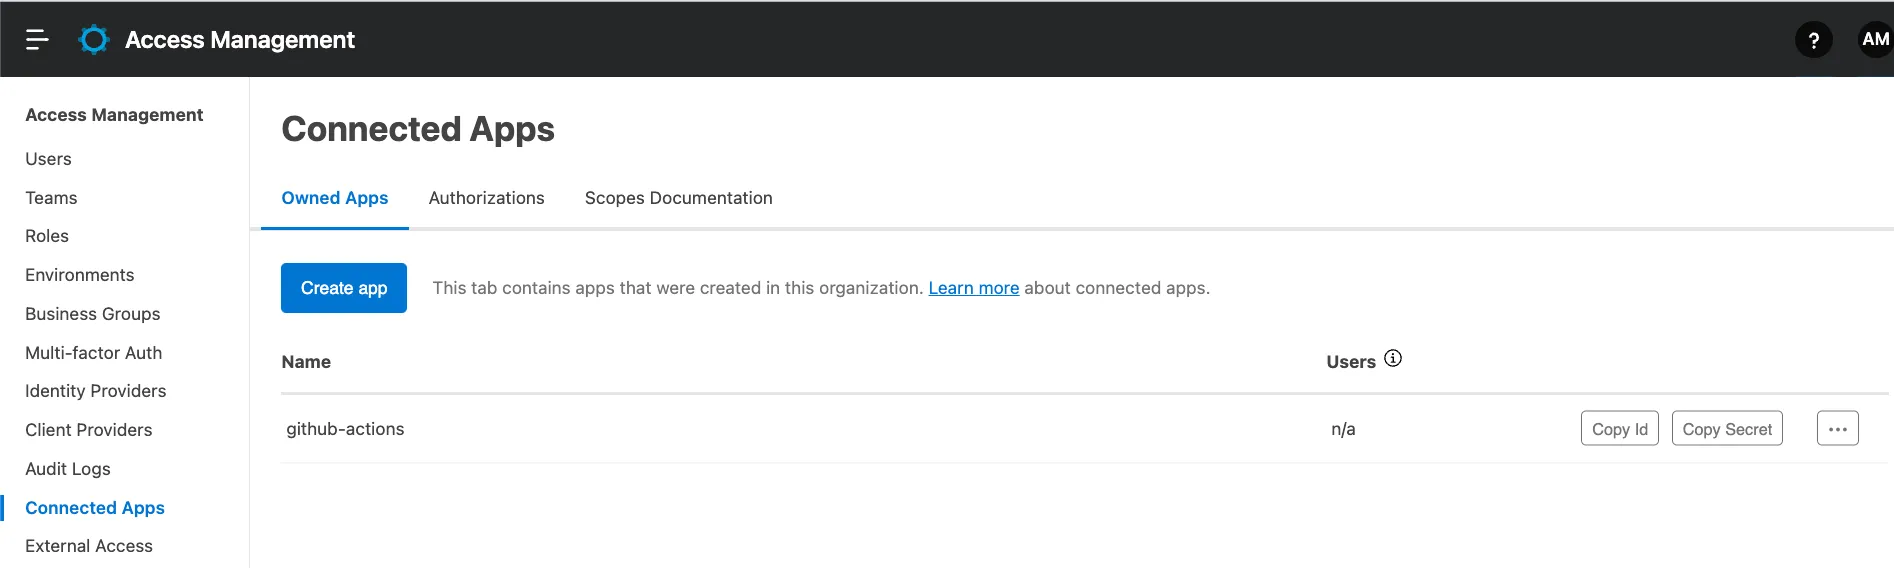
In this case, for demonstration purposes, these are the credentials I’ll be using:
ID: bf51f105b644471f812b2e0c0cb8a97b
Secret: 66B5ADCB18D4439D9C744236e3c590d3
Set up your credentials on GitHub
Just as we’ve done before, go to your GitHub repository and click on the Settings tab. Select Secrets and variables > Actions and add these two new secrets.
CONNECTED_APP_CLIENT_IDCONNECTED_APP_CLIENT_SECRET
The values should match what you previously extracted from Anypoint Platform.
Modify your pom.xml
In our pom.xml file, in the org.mule.tools.maven plugin, we used to have something like the following to authenticate via username and password.
<configuration>
  <cloudHubDeployment>
    ...
    <username>${anypoint.username}</username>
    <password>${anypoint.password}</password>
We are going to replace the username and password fields with the following.
<connectedAppClientId>${client.id}</connectedAppClientId>
<connectedAppClientSecret>${client.secret}</connectedAppClientSecret>
<connectedAppGrantType>client_credentials</connectedAppGrantType>
Here’s the complete pom.xml for this example:
<?xml version="1.0" encoding="UTF-8"?>
<project xmlns="http://maven.apache.org/POM/4.0.0" xmlns:xsi="http://www.w3.org/2001/XMLSchema-instance" xsi:schemaLocation="http://maven.apache.org/POM/4.0.0 https://maven.apache.org/xsd/maven-4.0.0.xsd">
<modelVersion>4.0.0</modelVersion>
<groupId>com.mycompany</groupId>
<artifactId>github-actions</artifactId>
<version>1.0.0-SNAPSHOT</version>
<packaging>mule-application</packaging>
<name>github-actions</name>
<properties>
<project.build.sourceEncoding>UTF-8</project.build.sourceEncoding>
<project.reporting.outputEncoding>UTF-8</project.reporting.outputEncoding>
<app.runtime>4.4.0</app.runtime>
<mule.maven.plugin.version>3.8.0</mule.maven.plugin.version>
<app.name>amartinez17-github-actions</app.name>
<env>Sandbox</env>
<munit.version>2.3.13</munit.version>
</properties>
<build>
<plugins>
<plugin>
<groupId>org.apache.maven.plugins</groupId>
<artifactId>maven-clean-plugin</artifactId>
<version>3.0.0</version>
</plugin>
<plugin>
<groupId>org.mule.tools.maven</groupId>
<artifactId>mule-maven-plugin</artifactId>
<version>${mule.maven.plugin.version}</version>
<extensions>true</extensions>
<configuration>
<cloudHubDeployment>
<uri>https://anypoint.mulesoft.com</uri>
<muleVersion>${app.runtime}</muleVersion>
<!-- <username>${anypoint.username}</username>
<password>${anypoint.password}</password> -->
<!-- Start: CONNECTED APP -->
<connectedAppClientId>${client.id}</connectedAppClientId>
<connectedAppClientSecret>${client.secret}</connectedAppClientSecret>
<connectedAppGrantType>client_credentials</connectedAppGrantType>
<!-- End: CONNECTED APP -->
<applicationName>${app.name}</applicationName>
<environment>${env}</environment>
<workerType>MICRO</workerType>
<region>us-east-2</region>
<workers>1</workers>
<objectStoreV2>true</objectStoreV2>
<!-- Start: SECURED PROPERTIES CI/CD -->
<properties>
<secure.key>${decryption.key}</secure.key>
</properties>
<!-- End: SECURED PROPERTIES CI/CD -->
</cloudHubDeployment>
<classifier>mule-application</classifier>
</configuration>
</plugin>
<plugin>
<groupId>com.mulesoft.munit.tools</groupId>
<artifactId>munit-maven-plugin</artifactId>
<version>${munit.version}</version>
<executions>
<execution>
<id>test</id>
<phase>test</phase>
<goals>
<goal>test</goal>
<goal>coverage-report</goal>
</goals>
</execution>
</executions>
<configuration>
<!-- START: MUnit coverage -->
<environmentVariables>
<secure.key>${decryption.key}</secure.key>
</environmentVariables>
<!-- END: MUnit coverage -->
<coverage>
<runCoverage>true</runCoverage>
<!-- START: MUnit coverage -->
<failBuild>true</failBuild>
<requiredApplicationCoverage>90</requiredApplicationCoverage>
<!-- <requiredResourceCoverage>50</requiredResourceCoverage> -->
<!-- <requiredFlowCoverage>50</requiredFlowCoverage> -->
<!-- END: MUnit coverage -->
<formats>
<!-- START: MUnit coverage -->
<format>console</format>
<format>sonar</format>
<format>json</format>
<!-- END: MUnit coverage -->
<format>html</format>
</formats>
</coverage>
</configuration>
</plugin>
</plugins>
</build>
<dependencies>
<dependency>
<groupId>org.mule.connectors</groupId>
<artifactId>mule-http-connector</artifactId>
<version>1.6.0</version>
<classifier>mule-plugin</classifier>
</dependency>
<dependency>
<groupId>org.mule.connectors</groupId>
<artifactId>mule-sockets-connector</artifactId>
<version>1.2.2</version>
<classifier>mule-plugin</classifier>
</dependency>
<dependency>
<groupId>com.mulesoft.modules</groupId>
<artifactId>mule-secure-configuration-property-module</artifactId>
<version>1.2.5</version>
<classifier>mule-plugin</classifier>
</dependency>
<dependency>
<groupId>com.mulesoft.munit</groupId>
<artifactId>munit-runner</artifactId>
<version>2.3.13</version>
<classifier>mule-plugin</classifier>
<scope>test</scope>
</dependency>
<dependency>
<groupId>com.mulesoft.munit</groupId>
<artifactId>munit-tools</artifactId>
<version>2.3.13</version>
<classifier>mule-plugin</classifier>
<scope>test</scope>
</dependency>
<dependency>
<groupId>org.mule.weave</groupId>
<artifactId>assertions</artifactId>
<version>1.0.2</version>
<scope>test</scope>
</dependency>
</dependencies>
<repositories>
<repository>
<id>anypoint-exchange-v3</id>
<name>Anypoint Exchange</name>
<url>https://maven.anypoint.mulesoft.com/api/v3/maven</url>
<layout>default</layout>
</repository>
<repository>
<id>mulesoft-releases</id>
<name>MuleSoft Releases Repository</name>
<url>https://repository.mulesoft.org/releases/</url>
<layout>default</layout>
</repository>
</repositories>
<pluginRepositories>
<pluginRepository>
<id>mulesoft-releases</id>
<name>MuleSoft Releases Repository</name>
<layout>default</layout>
<url>https://repository.mulesoft.org/releases/</url>
<snapshots>
<enabled>false</enabled>
</snapshots>
</pluginRepository>
</pluginRepositories>
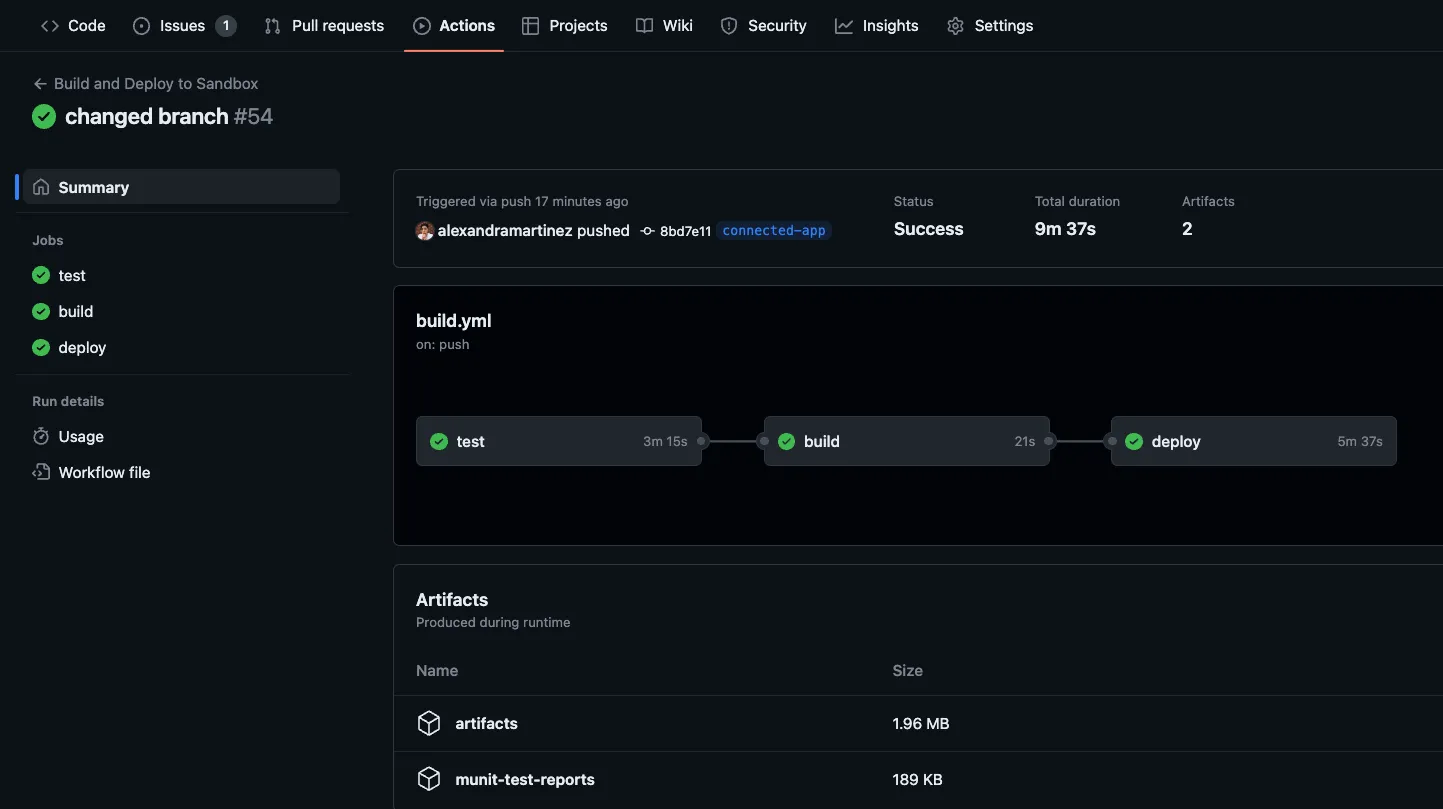
</project>That’s it for this file! Now let’s set up the pipeline to send these new credentials.
Modify your build.yml
Open the build.yml file we created inside .github/workflows. If you haven’t created this file yet, please refer to the first article to learn how to set it up.
Go to the deploy job and locate the last step: Deploy to Sandbox. This is what we used to have under env:
USERNAME: ${{ secrets.anypoint_platform_username }}
PASSWORD: ${{ secrets.anypoint_platform_password }}
And this is what we’ll replace it with:
ID: ${{ secrets.CONNECTED_APP_CLIENT_ID }}
SECRET: ${{ secrets.CONNECTED_APP_CLIENT_SECRET }}
We’ll change the Maven command to match these new secrets/properties. Instead of sending username and password, like this:
-Danypoint.username="$USERNAME" \
-Danypoint.password="$PASSWORD" \
We’ll now send the app’s ID and secret. Like this:
-Dclient.id="$ID" \
-Dclient.secret="$SECRET" \
Here’s the complete build.yml for this example:
name: Build and Deploy to Sandbox

on:
  push:
    branches: [ main ]

jobs:
  test:
    runs-on: ubuntu-latest
    steps:
    - name: Checkout this repo
      uses: actions/checkout@v3
    - name: Cache dependencies
      uses: actions/cache@v3
      with:
        path: ~/.m2/repository
        key: ${{ runner.os }}-maven-${{ hashFiles('**/pom.xml') }}
        restore-keys: |
          ${{ runner.os }}-maven-
    - name: Set up JDK 1.8
      uses: actions/setup-java@v3
      with:
        distribution: 'zulu'
        java-version: 8
    - name: Test with Maven
      env:
        nexus_username: ${{ secrets.nexus_username }}
        nexus_password: ${{ secrets.nexus_password }}
        KEY: ${{ secrets.decryption_key }}
      run: mvn test --settings .maven/settings.xml -Dsecure.key="$KEY"
    - name: Upload MUnit reports
      uses: actions/upload-artifact@v3
      with:
        name: munit-test-reports
        path: target/site/munit/coverage/

  build:
    needs: test
    runs-on: ubuntu-latest
    steps:
    - name: Checkout this repo
      uses: actions/checkout@v3
    - name: Cache dependencies
      uses: actions/cache@v3
      with:
        path: ~/.m2/repository
        key: ${{ runner.os }}-maven-${{ hashFiles('**/pom.xml') }}
        restore-keys: |
          ${{ runner.os }}-maven-
    - name: Set up JDK 1.8
      uses: actions/setup-java@v3
      with:
        distribution: 'zulu'
        java-version: 8
    - name: Build with Maven
      run: mvn -B package --file pom.xml -DskipMunitTests
    - name: Stamp artifact file name with commit hash
      run: |
        artifactName1=$(ls target/*.jar | head -1)
        commitHash=$(git rev-parse --short "$GITHUB_SHA")
        artifactName2=$(ls target/*.jar | head -1 | sed "s/.jar/-$commitHash.jar/g")
        mv $artifactName1 $artifactName2
    - name: Upload artifact
      uses: actions/upload-artifact@v3
      with:
          name: artifacts
          path: target/*.jar

  deploy:
    needs: build
    runs-on: ubuntu-latest
    steps:
    - name: Checkout this repo
      uses: actions/checkout@v3
    - name: Cache dependencies
      uses: actions/cache@v3
      with:
        path: ~/.m2/repository
        key: ${{ runner.os }}-maven-${{ hashFiles('**/pom.xml') }}
        restore-keys: |
          ${{ runner.os }}-maven-
    - uses: actions/download-artifact@v3
      with:
        name: artifacts
    - name: Deploy to Sandbox
      env:
        ID: ${{ secrets.CONNECTED_APP_CLIENT_ID }}
        SECRET: ${{ secrets.CONNECTED_APP_CLIENT_SECRET }}
        KEY: ${{ secrets.decryption_key }}
      run: |
        artifactName=$(ls *.jar | head -1)
        mvn deploy -DskipMunitTests -DmuleDeploy \
         -Dmule.artifact=$artifactName \
         -Dclient.id="$ID" \
         -Dclient.secret="$SECRET" \
         -Ddecryption.key="$KEY"
Run the pipeline
That’s it! Once you’re done with the changes, simply push a new change to the main branch and this will trigger the pipeline.
More resources
You can check out my GitHub profile for more CI/CD repos:
- github-actions to deploy a Mule app to CloudHub
- dataweave-utilities-library to publish a DataWeave library to Exchange
- api-catalog-cli-example to update APIs in Exchange using the API Catalog CLI
I hope this was helpful!
Don’t forget to subscribe so you don’t miss any future content.
FAQs
Frequently asked questions about this post.
-
Why can't I use my Anypoint Platform username and password in the pipeline when MFA is enabled?
Because you sign in to Anypoint Platform using MFA (multi-factor authentication, through an app on your phone or an SMS code, for example), you can no longer rely on just your username and password, so you have to create a Connected App and authenticate the pipeline with its ID and secret instead.
-
How do I create a Connected App in Anypoint Platform for the pipeline?
Sign in to Anypoint Platform and navigate to Access Management > Connected Apps, click Create app, give it a name like
github-actions, select App acts on its own behalf, click Add Scopes, then save and copy both the ID and Secret to use in the pipeline. -
Which scopes does the Connected App need for this CI/CD demo?
For the current business group and the Sandbox environment, the post selects Design Center Developer, View Environment, View Organization, Profile, Cloudhub Organization Admin, Create Applications, Delete Applications, Download Applications, Read Applications, and Read Servers.
-
How do I change my pom.xml to authenticate with a Connected App instead of a username and password?
In the
org.mule.tools.mavenplugin'scloudHubDeploymentconfiguration, replace the<username>and<password>fields with<connectedAppClientId>${client.id}</connectedAppClientId>,<connectedAppClientSecret>${client.secret}</connectedAppClientSecret>, and<connectedAppGrantType>client_credentials</connectedAppGrantType>. -
What changes do I make in build.yml to send the Connected App credentials?
In the deploy job's Deploy to Sandbox step, replace the
USERNAMEandPASSWORDenv entries withID: ${{ secrets.CONNECTED_APP_CLIENT_ID }}andSECRET: ${{ secrets.CONNECTED_APP_CLIENT_SECRET }}, then change the Maven command from sending-Danypoint.usernameand-Danypoint.passwordto sending-Dclient.id="$ID"and-Dclient.secret="$SECRET".
More from this series
CI/CD Pipeline with MuleSoft & GitHub Actions· Part 5 of 6
- 1.Part 1: How to set up a CI/CD pipeline to deploy your MuleSoft apps to CloudHub using GitHub Actions
- 2.Part 2: CI/CD pipeline with MuleSoft and GitHub Actions - secured/encrypted properties
- 3.Part 3: CI/CD pipeline with MuleSoft and GitHub Actions - MUnit testing
- 4.Part 4: CI/CD pipeline with MuleSoft and GitHub Actions - MUnit minimum coverage percentage
- 5.Part 5: CI/CD pipeline with MuleSoft and GitHub Actions - Enabling MFA through a Connected App
- 6.Part 6: CI/CD pipeline with MuleSoft and GitHub Actions - Deploying to CloudHub 2.0