Part 2: CI/CD pipeline with MuleSoft and GitHub Actions - secured/encrypted properties
In this post, we'll see the steps to create a pipeline with GitHub Actions that will decrypt your secured properties in your Mule app.
CI/CD Pipeline with MuleSoft & GitHub Actions· Part 2 of 6
- 1.Part 1: How to set up a CI/CD pipeline to deploy your MuleSoft apps to CloudHub using GitHub Actions
- 2.Part 2: CI/CD pipeline with MuleSoft and GitHub Actions - secured/encrypted properties
- 3.Part 3: CI/CD pipeline with MuleSoft and GitHub Actions - MUnit testing
- 4.Part 4: CI/CD pipeline with MuleSoft and GitHub Actions - MUnit minimum coverage percentage
- 5.Part 5: CI/CD pipeline with MuleSoft and GitHub Actions - Enabling MFA through a Connected App
- 6.Part 6: CI/CD pipeline with MuleSoft and GitHub Actions - Deploying to CloudHub 2.0

In the previous article, we learned the basics to get started with a simple CI/CD pipeline to deploy a Mule application to CloudHub. We learned how to create Secrets in GitHub for your Anypoint Platform credentials, how to set up the build.yml file to set up the workflows, how to run the pipeline and the details of each of the steps in the pipeline. If you haven’t gone through that, I highly recommend you do. The steps for this post won’t be as detailed.
In this post, we’ll see the steps to create a pipeline with GitHub Actions that will decrypt your secured properties in your Mule application. If you don’t have secured properties in your application, you may not need this configuration.
Prerequisites
You should already have all the setup in your Mule application for the secured properties. In summary, this is what you should already have:
- Your secure properties file(s) under
src/main/resources - Your encrypted properties (see Encrypt Properties Using the Secure Properties Tool)
- Your Secure Properties Config in Global Elements (
secure-properties:config) - The name of your decryption key property (i.e.,
secure.key) - We recommend you add the key name to the
mule-artifact.jsonfile so it appears hidden in Runtime Manager (i.e.,"secureProperties": ["secure.key"])
Important
Make sure your Mule application is correctly configured and works locally before attempting to create the pipeline. Otherwise, you might encounter some issues.
Set up your credentials
In your GitHub repository, go to the Settings tab (make sure you are signed in to see it). Now go to Secrets and variables > Actions. Here you will be able to set up your repository secrets.
In the previous tutorial, we added two credentials:
ANYPOINT_PLATFORM_PASSWORDANYPOINT_PLATFORM_USERNAME
For this part, we’re going to add a new one that will contain the decryption key.
Click on New repository secret. In the Name field, write DECRYPTION_KEY. In the Secret field, write the actual value of your key. For example, MyMuleSoftKey. Click Add secret.
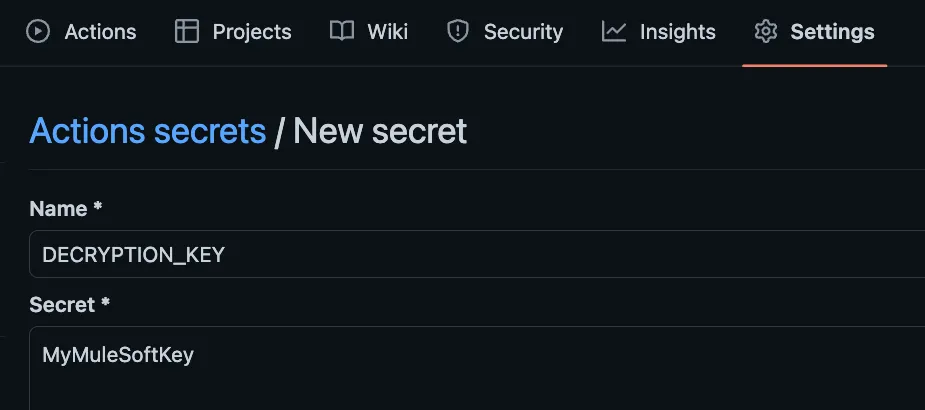
You don’t have to change the name of this secret. We will keep it as-is because it will be used in the pipeline. I’ll show you later in the post where to modify the name of the property to match the one you have in your Mule application (like secure.key).
Set up your repo
In the last post, we learned how to set up our build.yml file under .github/workflows for the actual pipelines in GitHub. This time, we are going to be using the same base file, just adding a few modifications to include the new decryption key.
You can copy and paste the following code into this file.
name: Build and Deploy to Sandbox

on:
  push:
    branches: [ main ]
  pull_request:
    branches: [ main ]

jobs:
  build:
    runs-on: ubuntu-latest
    steps:
    - name: Checkout this repo
      uses: actions/checkout@v3
    - name: Cache dependencies
      uses: actions/cache@v3
      with:
        path: ~/.m2/repository
        key: ${{ runner.os }}-maven-${{ hashFiles('**/pom.xml') }}
        restore-keys: |
          ${{ runner.os }}-maven-
    - name: Set up JDK 1.8
      uses: actions/setup-java@v3
      with:
        distribution: 'zulu'
        java-version: 8
    - name: Build with Maven
      run: mvn -B package --file pom.xml
    - name: Stamp artifact file name with commit hash
      run: |
        artifactName1=$(ls target/*.jar | head -1)
        commitHash=$(git rev-parse --short "$GITHUB_SHA")
        artifactName2=$(ls target/*.jar | head -1 | sed "s/.jar/-$commitHash.jar/g")
        mv $artifactName1 $artifactName2
    - name: Upload artifact
      uses: actions/upload-artifact@v3
      with:
          name: artifacts
          path: target/*.jar

  deploy:
    needs: build
    runs-on: ubuntu-latest
    steps:
    - name: Checkout this repo
      uses: actions/checkout@v3
    - name: Cache dependencies
      uses: actions/cache@v3
      with:
        path: ~/.m2/repository
        key: ${{ runner.os }}-maven-${{ hashFiles('**/pom.xml') }}
        restore-keys: |
          ${{ runner.os }}-maven-
    - uses: actions/download-artifact@v3
      with:
        name: artifacts
    - name: Deploy to Sandbox
      env:
        USERNAME: ${{ secrets.anypoint_platform_username }}
        PASSWORD: ${{ secrets.anypoint_platform_password }}
        KEY: ${{ secrets.decryption_key }}
      run: |
        artifactName=$(ls *.jar | head -1)
        mvn deploy -DmuleDeploy \
         -Dmule.artifact=$artifactName \
         -Danypoint.username="$USERNAME" \
         -Danypoint.password="$PASSWORD" \
         -Ddecryption.key="$KEY"
As you can see, we added a new KEY variable that will get the decryption key from our secrets; and we are sending a -Ddecryption.key parameter into the maven command.
Note
If you add this manually to the maven command, don’t forget to add a backslash (\) in the previous line.
Modify your pom.xml
Go to your Mule application’s pom.xml file and locate the cloudHubDeployment configuration. You will need to add the following property:
Note
this is where the name of your actual property needs to be set. In our example, we are using secure.key. Modify this field to match the name of your property, but keep the decryption.key since we’re using that in the GitHub Action pipeline.
<properties>
  <secure.key>${decryption.key}</secure.key>
</properties>
Your configuration should look something like this:
  <build>
    <plugins>
      <plugin>
        <groupId>org.apache.maven.plugins</groupId>
        <artifactId>maven-clean-plugin</artifactId>
        <version>3.0.0</version>
      </plugin>
      <plugin>
        <groupId>org.mule.tools.maven</groupId>
        <artifactId>mule-maven-plugin</artifactId>
        <version>${mule.maven.plugin.version}</version>
        <extensions>true</extensions>
        <configuration>
          <cloudHubDeployment>
            <uri>https://anypoint.mulesoft.com</uri>
            <muleVersion>${app.runtime}</muleVersion>
            <username>${anypoint.username}</username>
            <password>${anypoint.password}</password>
            <applicationName>${app.name}</applicationName>
            <environment>${env}</environment>
            <workerType>MICRO</workerType>
            <region>us-east-2</region>
            <workers>1</workers>
            <objectStoreV2>true</objectStoreV2>
            <!-- Start: SECURED PROPERTIES CI/CD -->
            <properties>
              <secure.key>${decryption.key}</secure.key>
            </properties>
            <!-- End: SECURED PROPERTIES CI/CD -->
          </cloudHubDeployment>
          <classifier>mule-application</classifier>
        </configuration>
      </plugin>
    </plugins>
  </build>
That’s all! Once you send these changes to the main branch, your pipeline will start running and deploying to CloudHub.
More resources
You can check out my GitHub profile for more CI/CD repos:
- github-actions to deploy a Mule app to CloudHub
- dataweave-utilities-library to publish a DataWeave library to Exchange
- api-catalog-cli-example to update APIs in Exchange using the API Catalog CLI
I hope this was helpful!
Don’t forget to subscribe so you don’t miss any future content.
FAQs
Frequently asked questions about this post.
-
Do I need this configuration if my Mule app has no secured properties?
No. This post is specifically about creating a pipeline that decrypts your secured properties, so if you don't have secured properties in your application you may not need this configuration.
-
What should I already have set up before building this pipeline?
Your secure properties file(s) under
src/main/resources, your encrypted properties, your Secure Properties Config in Global Elements (secure-properties:config), and the name of your decryption key property such assecure.key; it's also recommended to add the key name tomule-artifact.json(for example"secureProperties": ["secure.key"]) so it appears hidden in Runtime Manager. Make sure the app is correctly configured and works locally before attempting to create the pipeline. -
How do I add the decryption key to my GitHub repository?
In your GitHub repository go to the Settings tab while signed in, then Secrets and variables > Actions, and click New repository secret. In the Name field write
DECRYPTION_KEY, in the Secret field write the actual value of your key (for exampleMyMuleSoftKey), and click Add secret. Keep the nameDECRYPTION_KEYas-is because the pipeline uses it. -
What changes does this pipeline add compared to the basic Part 1 pipeline?
It uses the same base
build.ymlfile with a few modifications: a newKEYvariable that reads the decryption key from your secrets (KEY: ${{ secrets.decryption_key }}), and a-Ddecryption.keyparameter passed into the maven deploy command. If you add this to the maven command manually, don't forget to add a backslash (\) on the previous line. -
Where do I set the actual name of my secured property in the pom.xml?
In your Mule application's
pom.xml, locate thecloudHubDeploymentconfiguration and add a<properties>block containing<secure.key>${decryption.key}</secure.key>. Change thesecure.keyelement to match the name of your own property, but keepdecryption.keysince that's what the GitHub Action pipeline uses.
More from this series
CI/CD Pipeline with MuleSoft & GitHub Actions· Part 2 of 6
- 1.Part 1: How to set up a CI/CD pipeline to deploy your MuleSoft apps to CloudHub using GitHub Actions
- 2.Part 2: CI/CD pipeline with MuleSoft and GitHub Actions - secured/encrypted properties
- 3.Part 3: CI/CD pipeline with MuleSoft and GitHub Actions - MUnit testing
- 4.Part 4: CI/CD pipeline with MuleSoft and GitHub Actions - MUnit minimum coverage percentage
- 5.Part 5: CI/CD pipeline with MuleSoft and GitHub Actions - Enabling MFA through a Connected App
- 6.Part 6: CI/CD pipeline with MuleSoft and GitHub Actions - Deploying to CloudHub 2.0