How to connect your local Ollama AI using the MuleSoft AI Chain (MAC) project and Anypoint Code Builder (ACB)
Learn how to create and deploy an AI-powered API with Ollama and MuleSoft. Step-by-step guide from setup to CloudHub deployment for developers.

This post guides you through building an AI-powered API using Ollama and MuleSoft. You’ll start by installing Ollama locally, designing and implementing the API, and testing it in your development environment. With ngrok, you’ll expose the API publicly, and finally, deploy it to CloudHub for production use.
For guidance, you can follow along using this GitHub repository.
1 - Install Ollama locally
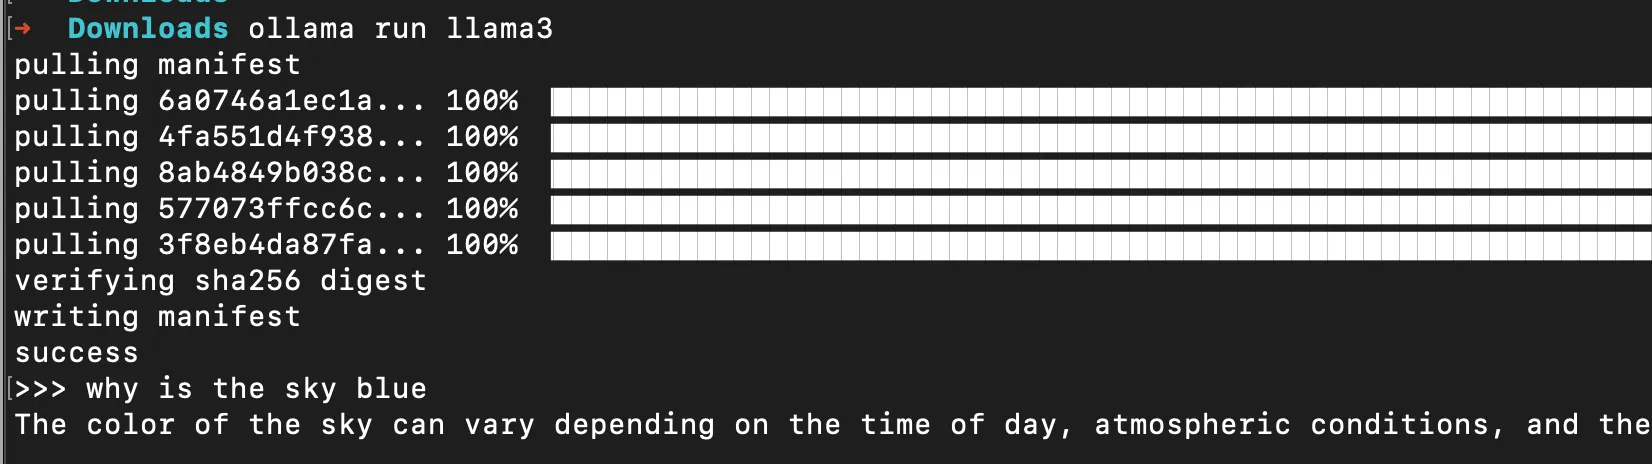
- Go to ollama.com and follow the prompts to install in your local computer
- Make a note of which version you started running (like llama3 or llama3.2)
- To verify ollama is running, you should either be able to interact with it in the terminal or you should be able to run “ollama list” or “ollama ps”
- We will verify the local installation in MuleSoft before deploying to CloudHub
2 - Create the API specification
- Open Anypoint Code Builder > Design an API
- Name it MAC-Ollama-API
- Select REST API > RAML 1.0
- Create Project
- Paste the following into this RAML file
#%RAML 1.0
title: MAC-Ollama-API
version: 1.0.0
description: Simple API to connect a Mule application and Ollama locally using the MAC project.
mediaType: application/json

/chat:
    post:
        body:
            description: The question to ask Ollama
            type: string
            example: "Hello!"
        responses:
            200:
                description: The response from Ollama
                body:
                    type: string
example: Hey! How's it going?- Publish to Exchange using the Command Palette in VS Code (cmd+shift+P or ctrl+shift+P)

- You can leave all the defaults (organization, project name, version, etc.) and wait for it to be published
3 - Implement the API
- Select Yes to implement this API in ACB
- Name it mac-ollama-proj, select the folder where you want to keep this, select Mule Runtime 4.8 and Java 17
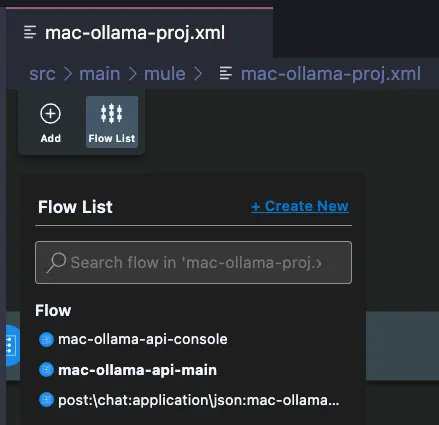
- Once the project finishes loading, open the
mac-ollama-proj.xmlfile undersrc/main/mule - Click on the Flow List button and switch to the one that starts with “post”
- Remove the logger from the flow
- Click on the plus button to add a new connector
- Click on the Exchange button to search in Exchange
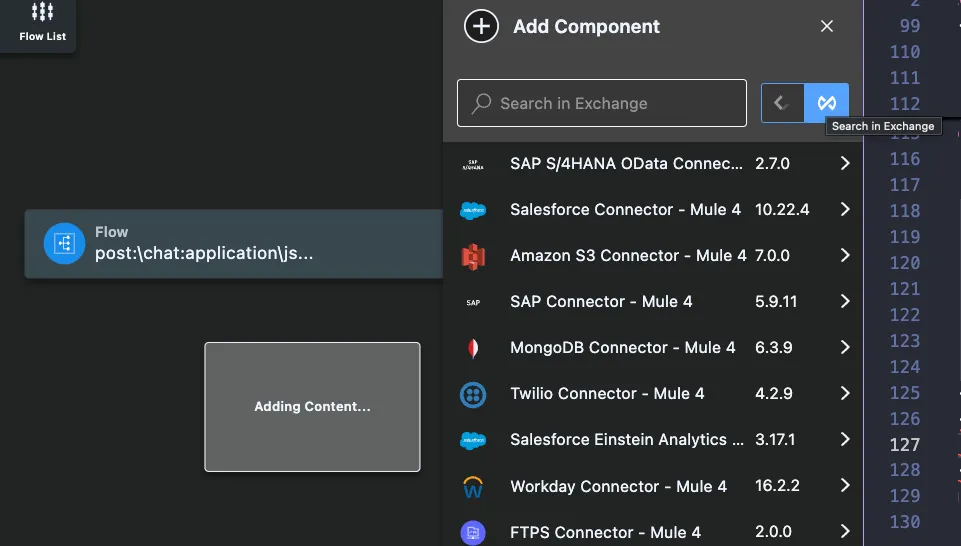
- Search for the MuleSoft AI Chain module and click on it
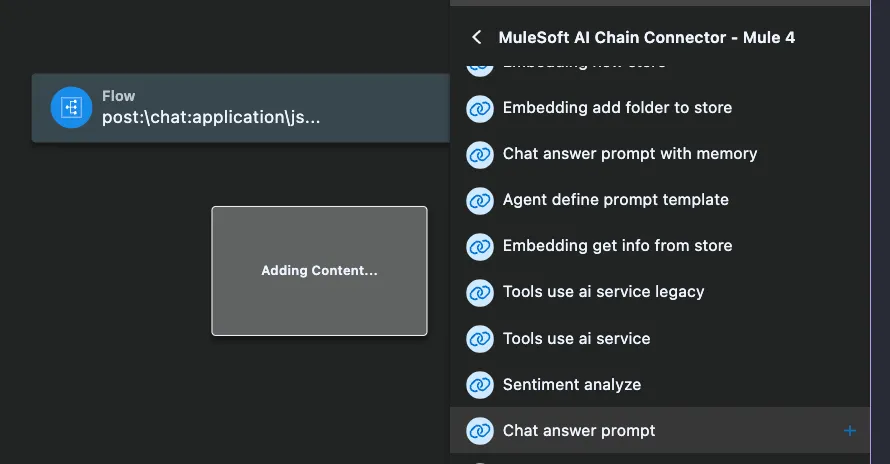
- Select the Chat answer prompt connector
- Click on the new connector from the canvas
- Click on the plus button next to the Connection Config
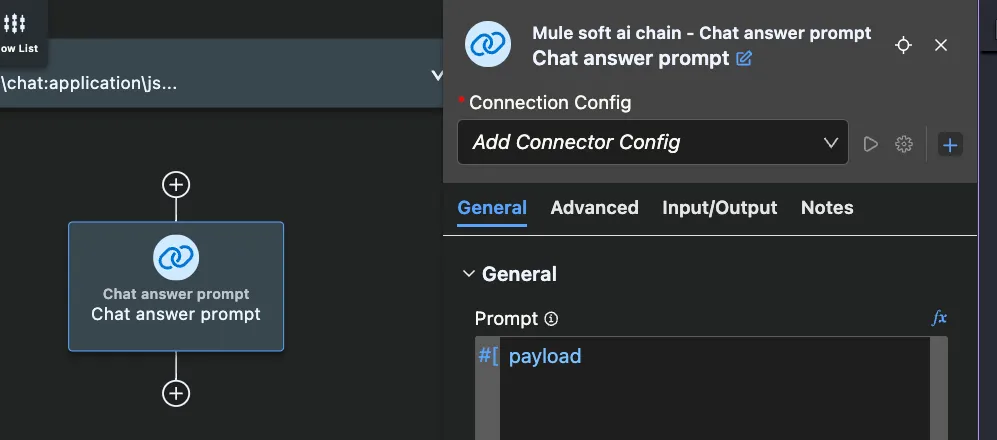
- Add the following details:
| Setting | Value | Notes |
|---|---|---|
| Name | MAC_Config | |
| LLM type | OLLAMA | |
| Config type | Configuration Json | |
| File path | mule.home ++ "/apps/" ++ app.name ++ "/llm-config.json" | *Make sure to click on the fx button to make this a formula instead of a hardcoded value |
| Model name | llama3 | *This will depend on the model you installed locally |
| Temperature | 0.7 | |
| LLM timeout | 60 | |
| LLM timeout unit | SECONDS (Default) | |
| Max tokens | 500 |
Note
This post was created when the MAC project was on version 1.0.0. This functionality may change in future versions.
- Click Add
- Back in the canvas, click on the plus button at the end to add a new connector
- Add a Transform
- Set it up like the following:
output application/json
---
payload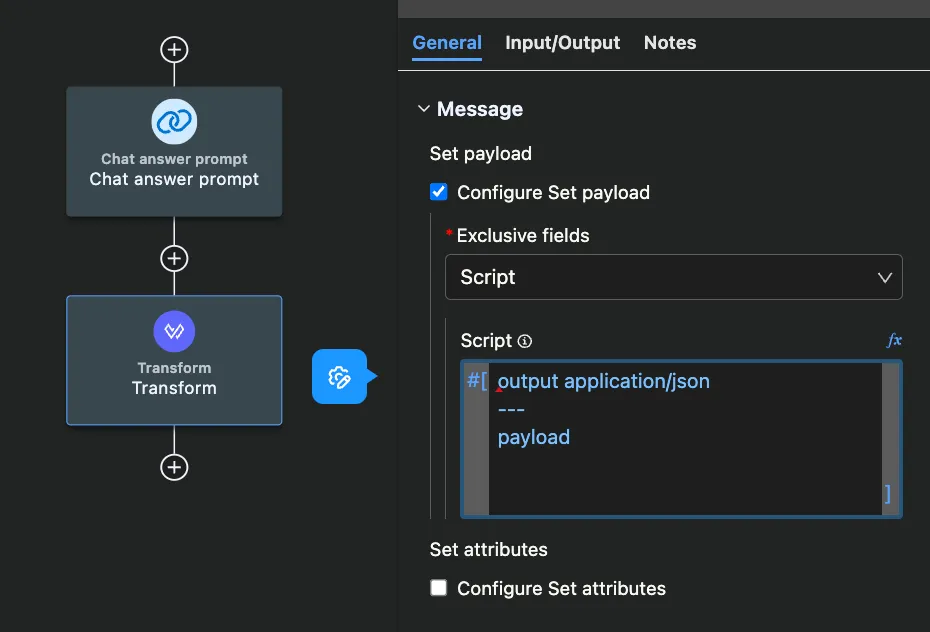
Note
If you see a red line/dot at the beginning of the script like in the previous screenshot, head to the XML view and remove the surrounding #[ ]
- You can add some loggers at the beginning and/or at the end of the flow to show the input/output payloads from the console
- The Global Configuration / MAC Connection Config should look like the following (located at the beginning of the XML file):
<ms-aichain:config configType="Configuration Json" filePath='#[mule.home ++ "/apps/" ++ app.name ++ "/llm-config.json"]' llmType="OLLAMA" modelName="llama3" name="MAC_Config"></ms-aichain:config>- The flow should look like the following (located at the end of the XML file):
<flow name="post:\chat:application\json:mac-ollama-api-config">
    <logger doc:name="Logger" doc:id="ezzhif" message="#[payload]" />
    <ms-aichain:chat-answer-prompt config-ref="MAC_Config" doc:id="mmoptd" doc:name="Chat answer prompt"></ms-aichain:chat-answer-prompt>
    <ee:transform doc:name="Transform" doc:id="czdqgi">
        <ee:message>
            <ee:set-payload>
                <![CDATA[output application/json
---
payload.response]]>
            </ee:set-payload>
        </ee:message>
    </ee:transform>
    <logger doc:name="Logger" doc:id="rzhuiw" message="#[payload]" />
</flow>- Create a new file called
llm-config.jsonundersrc/main/resourcesand paste the following:
{
    "OLLAMA": {
        "OLLAMA_BASE_URL": "http://localhost:11434"
    }
}
4 - Test the app locally
- Run the application locally
- Once it has started, send a POST request to localhost:8081/api/chat with a JSON body including your question
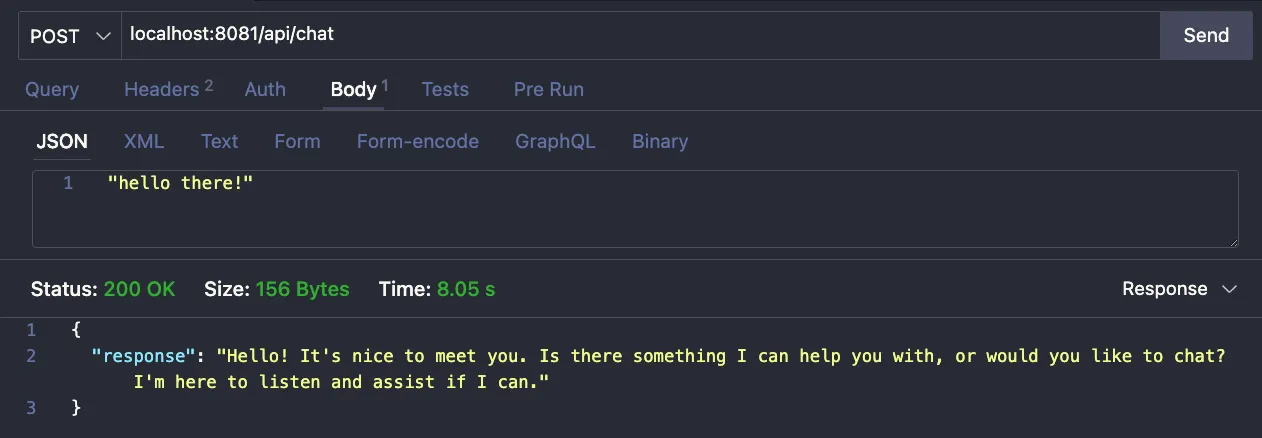
- If everything was successful, continue to the next step. Otherwise, please troubleshoot before continuing
- Stop the app
5 - Use ngrok for the public endpoint
- Download and install ngrok to make your Ollama endpoint publicly available from the internet. This way, CloudHub will be able to access the URL since it’s not only in your local (localhost:11434)
- Run the following from your Terminal:
ngrok http 11434 --host-header="localhost:11434"- Copy the address from the Forwarding field
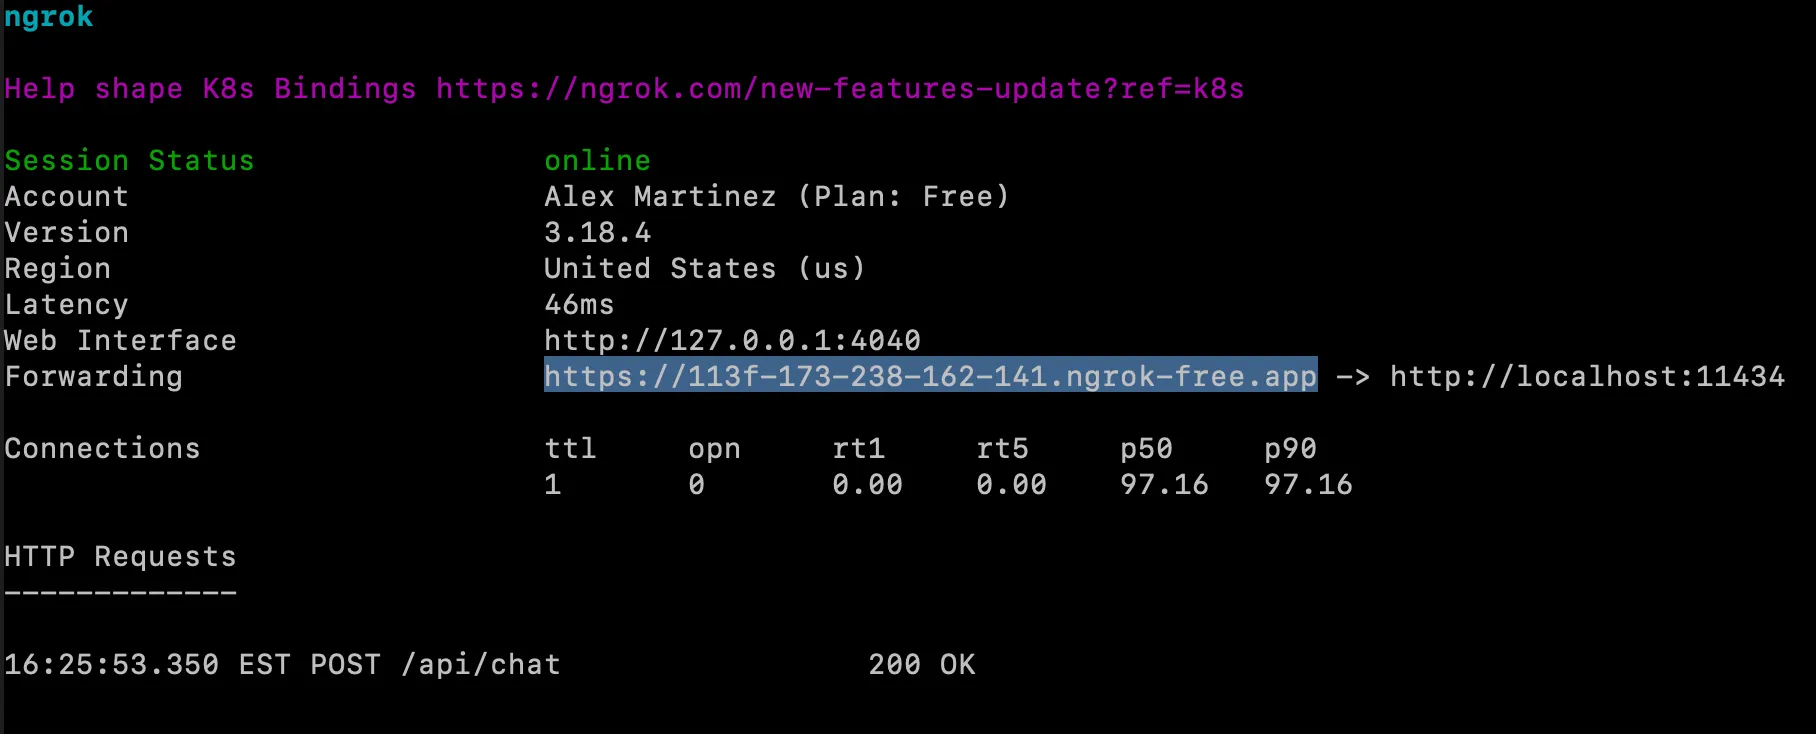
- Paste it in your
llm-config.jsonfile undersrc/main/resources
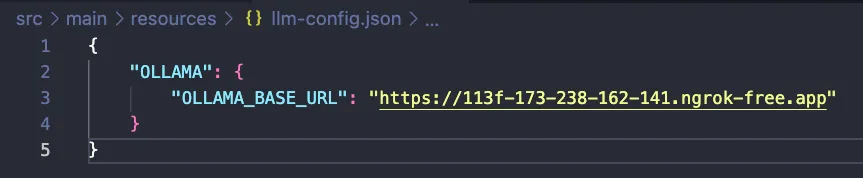
- Save the file and run the app again to verify everything still works correctly
- Stop the app once you verify it works
6 - Deploy to CloudHub
- If everything still works, you are ready to deploy to CloudHub
- Go to your
pom.xmlfile and change the version to 1.0.0 (remove the SNAPSHOT)

- Save the file
- Head to your
mac-ollama-proj.xmlfile and click on the Deploy to CloudHub button
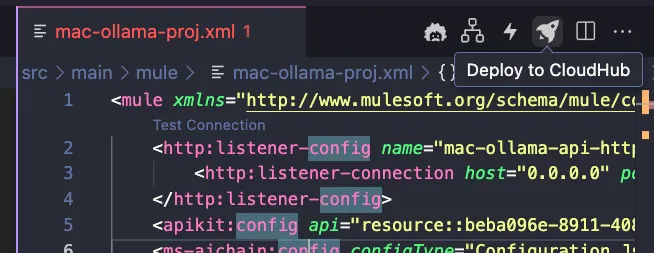
- Select CloudHub 2.0
- Select the
US-EAST-2(or whichever region is available on your account) - Select the Sandbox environment
- Make sure everything looks good in the newly created
deploy_ch2.jsonfile and click on Deploy - Select the Runtime version (including the patch)
- It will first publish the project to Exchange (as an application)
- After that, it will be deployed to CloudHub
- If you’re experiencing a lot of issues deploying from ACB, you can also take the generated JAR from the target/ folder and deploy it manually to Runtime Manager
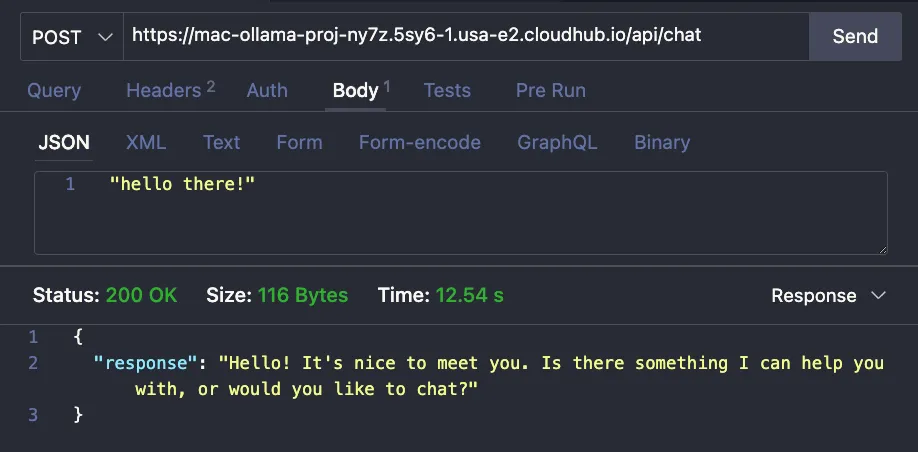
- Once the deployment is done, get the Public Endpoint from your application and call it to verify the app works
Subscribe to receive notifications as soon as new content is published ✨
💬 Prost! 🍻
FAQs
Frequently asked questions about this post.
-
Why do I need ngrok to deploy this app to CloudHub?
Ollama runs on your local computer at
localhost:11434, which CloudHub cannot reach. You download and install ngrok to make your Ollama endpoint publicly available from the internet, runngrok http 11434 --host-header="localhost:11434", then copy the Forwarding URL intoOLLAMA_BASE_URLin yourllm-config.jsonso CloudHub can access it. -
How do I configure the MuleSoft AI Chain connector to talk to Ollama?
After adding the Chat answer prompt connector, create a Connection Config named
MAC_Configwith LLM type OLLAMA, Config type Configuration Json, a file path ofmule.home ++ "/apps/" ++ app.name ++ "/llm-config.json"(click the fx button so it is a formula, not a hardcoded value), Model name llama3 (depending on the model you installed locally), Temperature 0.7, LLM timeout 60, LLM timeout unit SECONDS, and Max tokens 500. -
What model name should I use in the connector config?
Use the model you actually installed locally with Ollama. The post uses llama3 as an example, but it notes the Model name will depend on the model you installed (such as llama3 or llama3.2), so make a note of which version you started running.
-
How do I test the app locally before deploying?
Run the application locally, and once it has started send a POST request to
localhost:8081/api/chatwith a JSON body that includes your question. If you get a successful response from Ollama you can continue; otherwise troubleshoot before moving on, then stop the app. -
What do I change before deploying to CloudHub?
Open your
pom.xmland change the version to 1.0.0 by removing the SNAPSHOT suffix, save it, then use the Deploy to CloudHub button inmac-ollama-proj.xml, selecting CloudHub 2.0, a region likeUS-EAST-2, the Sandbox environment, and the Runtime version. If you hit a lot of issues deploying from ACB, you can instead take the generated JAR from thetarget/folder and deploy it manually to Runtime Manager.